We, at Cloudbric, are always looking to help you grow your website and protect it. So, when we heard that you guys had some questions about Cloudbric registration, we listened and created a registration guide to help you step-by-step. There are two ways to finalize Cloudbric registration, and get free comprehensive website security. Before getting started check out our introductory video below!
Web Traffic and Name Servers
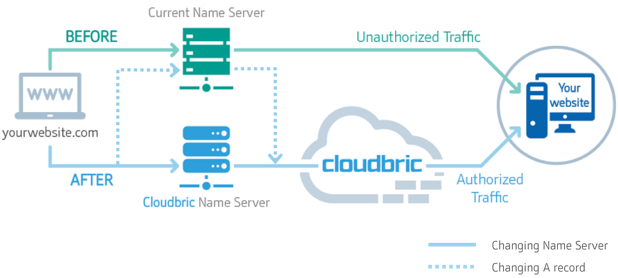
All web URLs are actually recognized by computer systems as a unique web server IP address. However, users, such as yourself, might find it difficult to remember your favorite website as “12.14.784.351”. In simpler terms, name servers act as almost like a phonebook, which cross checks when a user types a domain URL and matches that URL with its corresponding web server IP address. It is essentially the middle man between a visitor trying to visit your website and the actual website’s IP address. In addition, your DNS settings are stored on your Name Server.
Sign-up Steps After Inputting Your Website URL
Next, we will outline the steps to get Cloudbric website protection.
1. Change Your Name Server
With this option, Cloudbric will automatically detect your name server and will assign a new Cloudbric name server to you.
2. Change Your A-Record
With this option, you would not change your Name Server, but instead, you would change your A-Record in your web hosting provider’s console.
Pros and Cons to Each Method
Pros to Changing Your A-Record
- Easier for those who have multiple sub-domains (i.e: blog.yourwebsite.com, mobile.yourwebsite.com, etc)
- More convenient for those who cannot change a name server due to restrictions (i.e- when you are building off of a Tumblr or university name server).
Cons to Changing Your A-Record
- You cannot view your DNS and security settings together—your web hosting console will store your DNS settings and your Cloudbric dashboard will store your security settings.
- Also, anytime you make changes to your DNS settings, it takes many hours for it to update. DNS servers are the internet’s phone book, so every time you update your DNS settings, it takes time for the changes to be recognized in your IP
Pros to Changing Your Name Server
- You can view your DNS and security settings together in your Cloudbric dashboard
- Updating your Name Server instead of your A-records results in a short time in updating your DNS settings
Cons to Changing Your Name Server
- If you have multiple sub-domains, it can be a complicated process to update the DNS settings for each sub-domain
- Some web hosting sites do not allow you to change your name server (university websites, Tumblr, Wix, etc)

Some important notes while updating your Name Server or A-Records
In order to change Name Server, log into your web hosting provider’s console (i.e- Godaddy.com) and look for the section named: Name Server. Update all Name Servers that you see available
In order to change A-records, log into your web hosting provider’s console (i.e- Godaddy.com) and look for the section named: DNS Settings. Update all A (Host) Records. Now, redirect your @ Host to the Cloudbric IP address provided to you when you register.
How to Set Up Your E-mail Under Cloudbric
Remember if you use your domain as a mail service, please ensure the following:
1. Have your e-mail server be in the format of: mail.yourwebsite.com
2. Have your A-record also be in the format of: mail.yourwebsite.com
3. Make sure that your original webmail subdomain is pointing to your original web mail Server IP address
After you have ensured the above steps, log into your web hosting provider’s console
4. Look for the section named: DNS Settings. Update all A (Host) Records and look to see if the mail A-record is pointing to your original e-mail IP address
5. Scroll down to the MX (Mail Exchanger) sub-section and make sure that it is pointing to your Mail-sub domain


